The PropertyGrid control, basic concepts
One of the GUI (graphic user interface) controls more versatile that the .NET framework offers is the PropertyGrid. It is a component through which the user can edit all the properties of an object that the developer has configured, allowing structuring them into categories and sort them alphabetically. It also provides many options to customize both presentation and editing of their properties and shows the user a help text on each one of them. In this series I will show a complete tutorial on using this control and its main features, starting with this article on its basic use.
In this link you can download the project with the sample code of the PropertyGrid control, written with Visual Studio 2013 that I will use in this article.
This control is not installed by default in the Visual Studio toolbox, so, the first step, if you can't find it, is to add it. To do this, simply press the right mouse button on it and select the Choose Items... option.
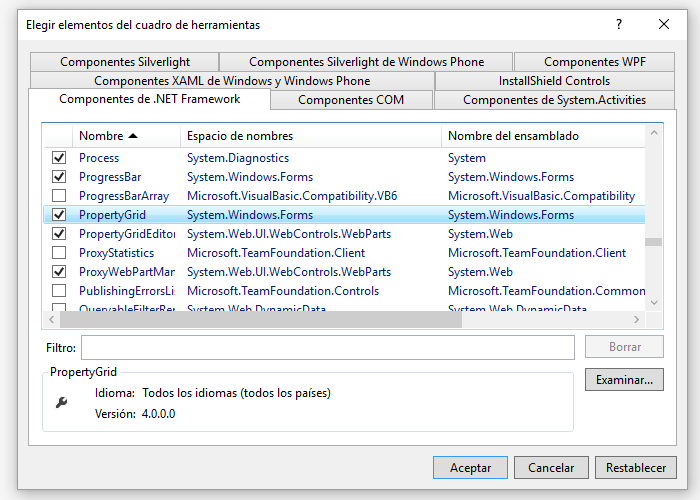
In the .NET Framework Components tab look for the PropertyGrid control and mark it to be installed. It will appear in the All Windows Forms section of the toolbox.

Now you can drag it on your form, this is the aspect that presents:
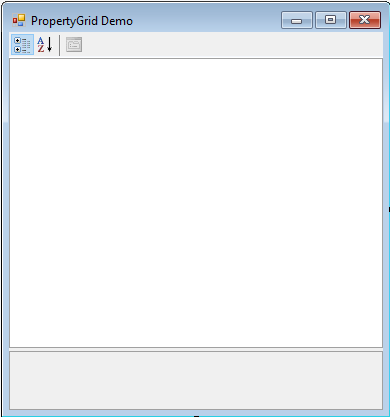
At the top there is the toolbar, which allows you to show the object properties classified by categories or alphabetically. The central part will be occupied by the object's properties, while at the bottom there is a help text on the property that the user has selected in the control.
This is the appearance of the control once you launch the program:
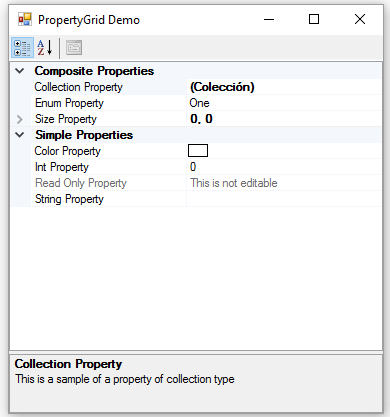
Configuring the objects in order to show them in the PropertyGrid
The configuration of the class of the objects that we will edit by means of the control is very simple, and is performed by using attributes, most of them located in the System.ComponentModel assembly, so, the first thing to do is to add the corresponding using statement:
using System.ComponenModel;
The first attribute we will see is Browsable. With this attribute you can indicate which properties you want to show to the user and which not. By default, all public properties will be displayed, so you only have to use this attribute with the properties that you not want to show to the user, like this:
[Browsable(false)]
public string NonBrowsable { get; set; }
You can classify the different properties into categories with the Category attribute, to show them grouped, as follows:
[Category("Name of the category")]
public string StringProperty { get; set; }
This attribute must be added to all properties. Those which are not decorated with it are shown grouped in a default category.
By default, the properties are displayed with the name you have given them. You can change this behavior by using the DisplayName attribute, indicating the name you want to show to the user, which can contain spaces and symbols not allowed in property names:
[Category("Name of the category")]
[DisplayName("Name to show to the user")]
public string StringProperty { get; set; }
You can also add a help text that provides information to the user about the use of the property in question, using the Description attribute:
[Category("Name of the category")]
[DisplayName("Name to show to the user")]
[Description("Help text")]
public string StringProperty { get; set; }
The property values are shown in bold by default, we can indicate a default value for the property with the DefaultValue attribute, when the property has the value indicated in the attribute, the text will appear in normal font, and only appear in bold when the user changes his value, which may help it to know that values have changed:
[Category("Name of the category")]
[DisplayName("Name to show to the user")]
[Description("Help text")]
[DefaultValue(0)]
public int IntProperty { get; set; }
Sometimes it can be necessary for the user to see the value of a property but you want to disallow it to change his value. For this you have the ReadOnly attribute:
[ReadOnly(true)]
public string ReadOnlyProperty { get; set; }
You may also want that the values of the control's properties are refreshed when the user changes the value of one given property. To achieve this, there is the RefreshProperties attribute, which must apply to the property/ies that if changing his value should cause the refresh of all the control:
[Category("Name of the category")]
[DisplayName("Name to show to the user")]
[Description("Help text")]
[RefreshProperties(RefreshProperties.All)]
public Size SizeProperty { get; set; }
Now, for the PropertyGrid control to display the object properties, you simply have to assign it to the property SelectedObject:
pgControl.SelectedObject = new DemoObject();
There is also the SelectedObjects property that allows you to assign to the control a collection of objects so that all common public properties can be edited at the same time, assigning them the same value when the user modifies them.
Editing properties in the PropertyGrid Control
Most basic types of the .NET framework have default editors appropriate for editing the type in question, the simplest of which is a text editor for text strings, similar to a TextBox with which they will be edited for example properties of type string and all numeric types in general.
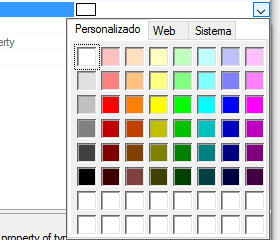
But there are much more sophisticated default editors for certain types. For example, a property of type Color has a drop-down list that lets you select colors similar to the ColorDialog dialog box:
The properties of enum type have a drop-down list with the possible enumeration values:

Structures and classes allow expand its public members to be edited one by one:

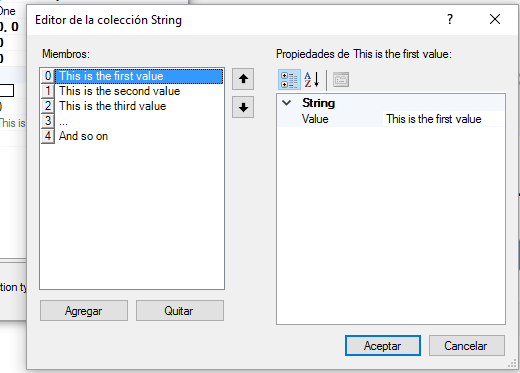
And the collections present a dialog box that lets you select and edit the objects through another PropertyGrid contained in it:
A little problem with this control is that, as his configuration is performed by means of attributes, you cannot change the language of the texts presented to the user. To end this article, I will show how you can solve this by using custom attributes, by deriving classes from the basic attributes Category, DisplayName and Description.
Globalizing the PropertyGrid Control
The first thing to do is to add a resource file to your project, which will contain the text strings in the default language you prefer. In it you have to define all category names, properties display names and help texts, giving them a resource name, like as follows:
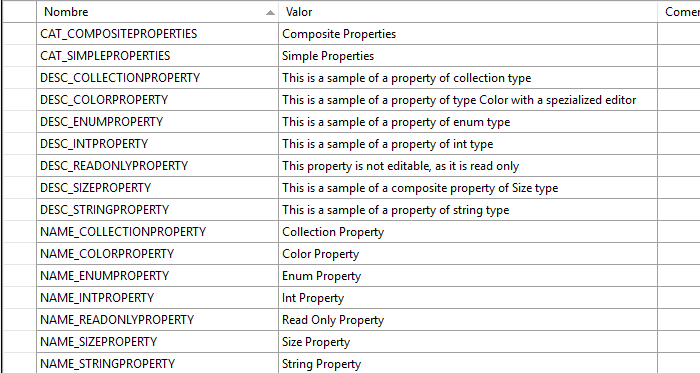
The derived classes are in the GlobalizedAttributes project file. In them, the constructor also accepts a string as an argument, but in this case will be the name of the resource that represents the text to display, instead of the text itself. Then, you just have to override the appropriate method to read the string from the resource file of the application. For example, with the Description attribute, do the following:
public class DescriptionGlobalAttribute : DescriptionAttribute
{
    private bool m_bTranslate = true;

    public DescriptionGlobalAttribute(string id)
        : base(id)
    {
    }
    public override string Description
    {
        get
        {
            if (m_bTranslate)
            {
                DescriptionValue =
                    Resources.ResourceManager.GetString(base.Description,
                    Thread.CurrentThread.CurrentCulture);
                m_bTranslate = false;
            }
            return DescriptionValue;
        }
    }
}
Now, just change the standard attributes with the new globalized attributes and replace the texts with the resource names:
[CategoryGlobal("CAT_SIMPLEPROPERTIES")]
[DisplayNameGlobal("NAME_STRINGPROPERTY")]
[DescriptionGlobal("DESC_STRINGPROPERTY")]
public string StringProperty { get; set; }
Once you have completed the application, you just have to create a new resource file for each language. The file must be named the same as the default resource file, and you have to add the name of the language that contains, as follows:
Resources.resx  (The resources in the default language)
Resources.es.resx (The spanish resources, by example)
etc.
You have to move the file to the Properties folder, copy and paste all text strings from the default resource file and translate it into the appropriate language.
Keep in mind that the attributes are translated only the first time the class is instantiated, so, if you want to change the language after the translation is done, you must restart the application so the change take effect (you can save the new language in the .config file first and make the change when the application starts, reading it from this file), for example:
Thread.CurrentThread.CurrentCulture = new CultureInfo("es");
In the next article I will show you some PropertyGrid events and custom property editors.


