Chess match database manager VI
I finish the series dedicated to the ChessPosDB chess match database manager with this article. You can download the application using this link. If you want to start the series from the beginning, here is the first article in this series. In this post, I will explain how to install and configure the database server used with the application, which can be Oracle, MySQL, or SQL Server. Whichever database server you choose, you can install it on the same computer as the application or on another more powerful computer that you can access through your local network.
Although each server has its minimum memory and processor requirements, I would recommend for all cases a quad-core processor at 3 GHz or more, about 16 GB of DDR4 RAM, and an SSD disk (better a PCI Express M.2 SSD than a SATA) to install the database. You have to install the ChesPosDB application in Windows 10. If you install the database server on another computer, it can have any operating system supported by the server you choose.
Microsoft .NET Framework 4.6.1 must be installed on the computer for the program to work. Usually, it is already installed, but if there is not the case, when you run the application for the first time, the explorer should open to give you the possibility to download and install it. You can also search Microsoft's page on Google to download it from there. It is unnecessary to run any setup for the ChessPosDB application. Just unzip it in any directory.
Installing the database in MySQL
Here you have a tutorial on installing the MySQL database server. You will have to select during the setup the database engine, the MySQL Workbench application. You have to install the .NET connectors so that the application can connect to the database. If you install the database on another computer, you have to install these connectors on the same computer as the ChessPosDB application; they are not useful on the server. Here is the link to download MySQL. In the image, you can see the three options you have to install: the database server, MySQL Workbench, and the .NET connector:
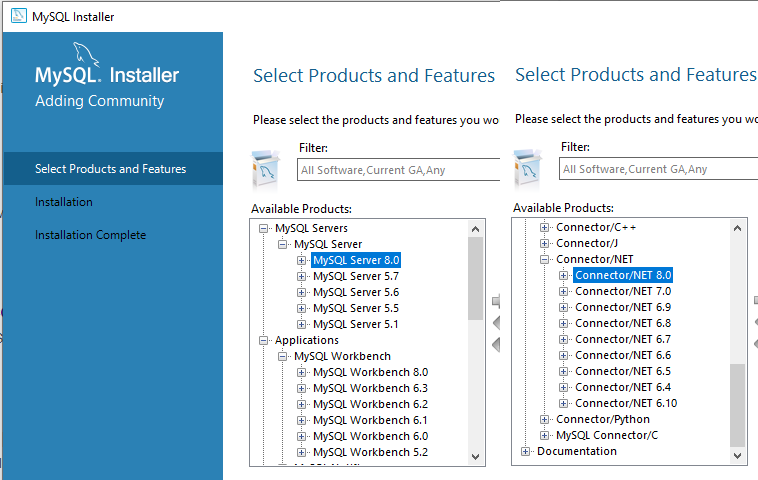
These are the versions that I have installed:

You don't need the third option, MySQL for Visual Studio. You have to install MySQL Server on the computer where you want to have the database. Install the connector on the same computer as the application. It is better to install the MySQL Workbench on the same computer as the server, although you can install it on the computer you want.
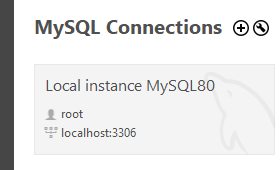
Once you have installed everything, you have to create the database using the scripts in the Scripts subdirectory of the folder where you have installed the ChessPosDB application. There are three different scripts for MySQL: MySql.sql, MySql_objects.sql, and MySql_code.sql. First of all, you have to connect to the database with MySQL Workbench using the root user, using the password you have assigned to it during the installation:
Open the MySql.sql script with the Open SQL Script option in the File menu:
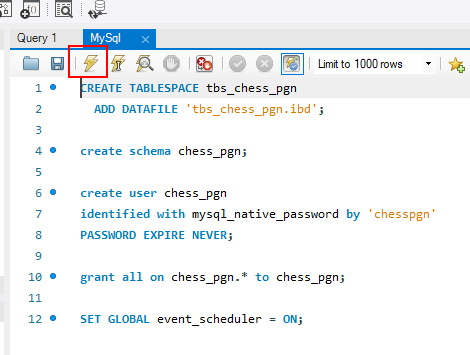
This script will create the database and the login user, chess_pgn, with the password chesspgn. To run it, use the button with a lightning bolt that I have marked in red. Next, you have to perform the same operation with the MySql_objects.sql and MySql_code.sql scripts, in this order.
Open the ChessPosDB.exe.config file in Notepad to configure the connection in the ChessPosDB application. It is an XML file:
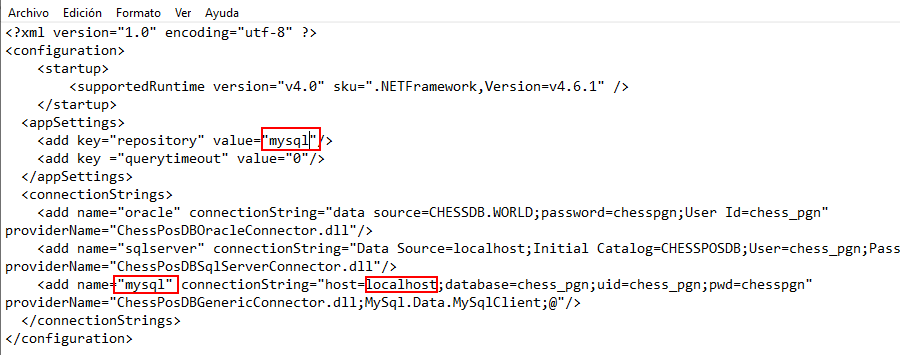
Ensure that the repository field value is the same as the MySQL connection name field (you can change them). If the server is on the same computer as the application, you can leave the host field as it is. If not, you have to write the name or the IP address of the server. In this case, you may have to open port 3306 on both computers, using the antivirus or Windows firewall settings.
Installing the database in SQL Server
Here you have a tutorial on installing the SQL Server database server. You will also need an application to install the database creation scripts. You can use SQL Server Management Studio, which is free. You can download it separately or install it together with the database. Here is the link to download SQL Server. You have to download the Developer edition, not the Express version. In this case, it is unnecessary to install additional connectors.
During the setup, you must assign a password to the administrator user sa, with which you will later create the database. You can also add your Windows user if you choose the mixed authentication option during installation and click the Add Current User button.
Once everything installed, open SQL Server Management Studio and log in with the sa user:
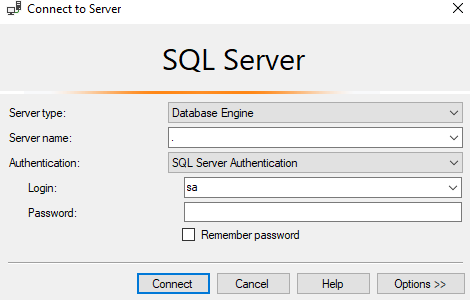
If the database is on another computer, you will have to write the name of the server in the Server name text box. A period (.) means to connect to the local server.
You have to open the SqlServer.sql script using the Open File button, marked in the image with a red box. This script is in the Scripts subdirectory of the folder where you have installed the ChessPosDB application.
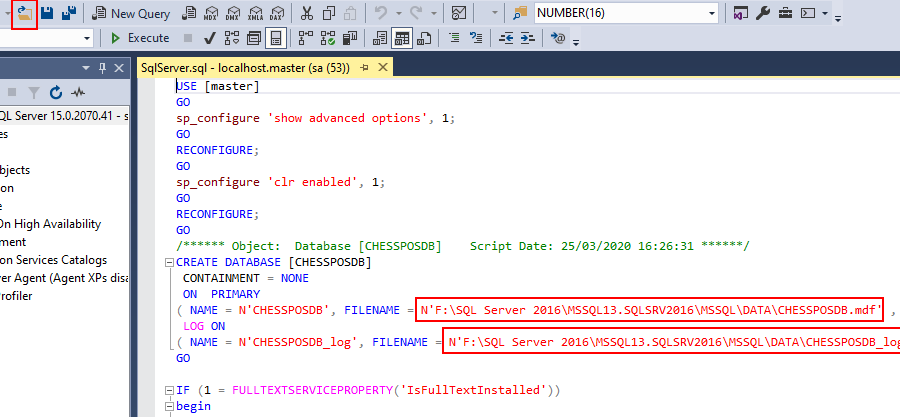
You also have to change the text marked with red rectangles to indicate where to create the server database files. Change the text between the quotes. You don't need to change the names of the files. The path you write must exist before launching the script.
Next, run the script with the Execute button on the toolbar above the script. You have to perform the same operation with the SqlServer_objects.sql script, which does not need any modification. The last script is SqlServer_code.sql, and this one again needs a little change:
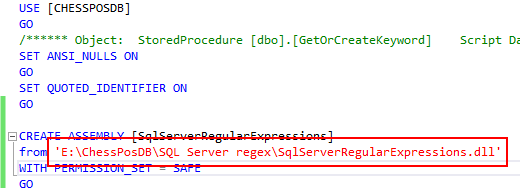
You have to found this file in the ChessPosDB installation directory and change the path in the script. Usually, you just have to change the drive letter.
You have to open the ChessPosDB.exe.config file in Notepad to configure the ChesPosDB connection. It is an XML file:
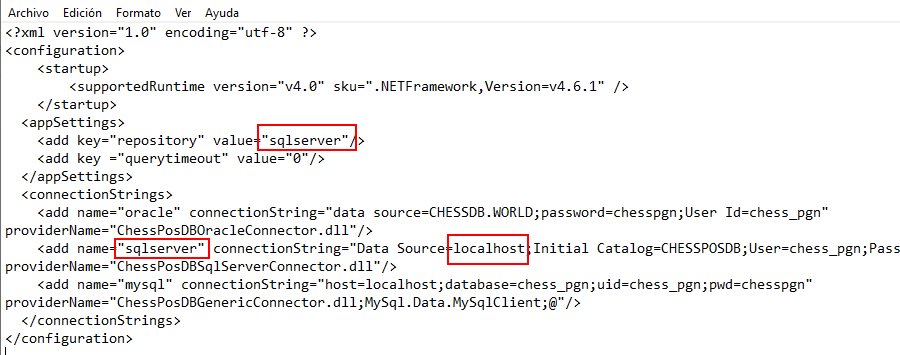
Ensure that the repository field value is the same as that of the SQL Server connection name field (you can change them). If the server is on the same computer as the application, you can leave the Data Source field as it is. If not, you have to write the name or the IP address of the server. In this case, you may have to open port 1433 on both computers, using the antivirus or Windows firewall settings.
Installing the database in Oracle
I have left Oracle until the last because it is the most complicated installation. However, I think it is the database engine that gives the best performance, if you have a powerful enough computer to install it, of course. Here you have a tutorial on installing the Oracle server. To download it, you have to enter the Oracle website and create an account. You just have to put in the email address, a password, and some personal information, and it has no cost. Then, find the database among the products and download it. You have to select the latest version for your operating system; it is better to choose the 64-bit version (x64). You will download a ZIP file you have to unzip on the disk where you want to create the database. Next, run the setup.exe program that is inside that directory and follow the tutorial. Try to change the default options as little as possible, and save the passwords that the setup asks for. There is no need to create any connection at the end of the setup process; later, I will explain how to do it by hand. When the installation finishes, do not delete the directory where you have unzipped the ZIP file; there is all the server software.
You have to install the Oracle ODAC connectors on the computer where the ChessPosDB application is, too. The application needs them to connect to the database. Click on the previous link and download the file ODAC122011_x64.zip. The setup is similar to that of the database. Remember to check the checkbox to install the connectors for all users when this option appears. Also, remember the installation directory, which appears at the beginning of the setup process.
Here you will also need an application to create the database. You can use SQL Developer, which is also from Oracle and is for free.
Once the database server setup finishes, you can configure the network addresses to accept connections on the server by opening the text file LISTENER.ORA, which is in the Oracle installation directory, in the Network/Admin folder:
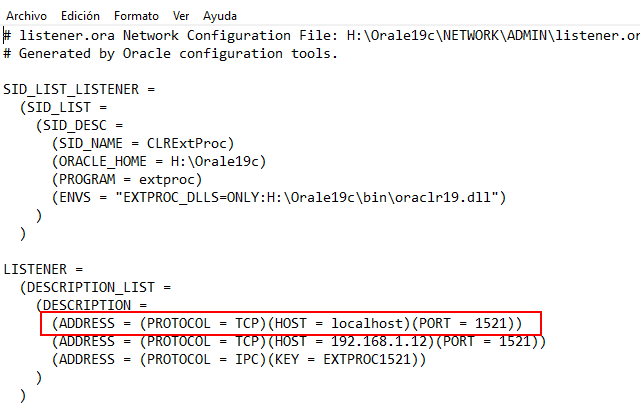
In this example, I have configured a local address (in a red box) and another in the local network (the IP has to be that of your server).
In this same directory, there is the text file TNSNAMES.ORA, used to configure the connections with the server:
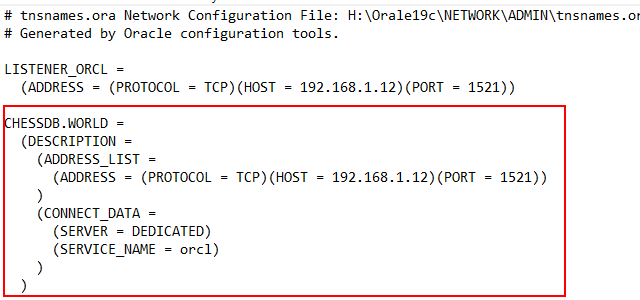
In the red box, you have the configuration for the database connection for the ChessPosDB application (you have to change the IP address for that of your server). This file is also in the directory where you have installed ODAC, and this is the one that you have to modify on the computer where the application runs. It will be on a path similar to this:
E:\app\client\mdkus\product\12.2.0\client_1\Network\Admin
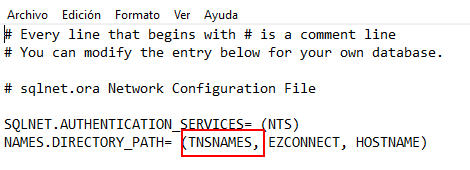
In this path, there is also the sqlnet.ora text file. You just have to ensure that you have the parameter marked in red:
Use SQL Developer to create the database. First, you must configure the connections:
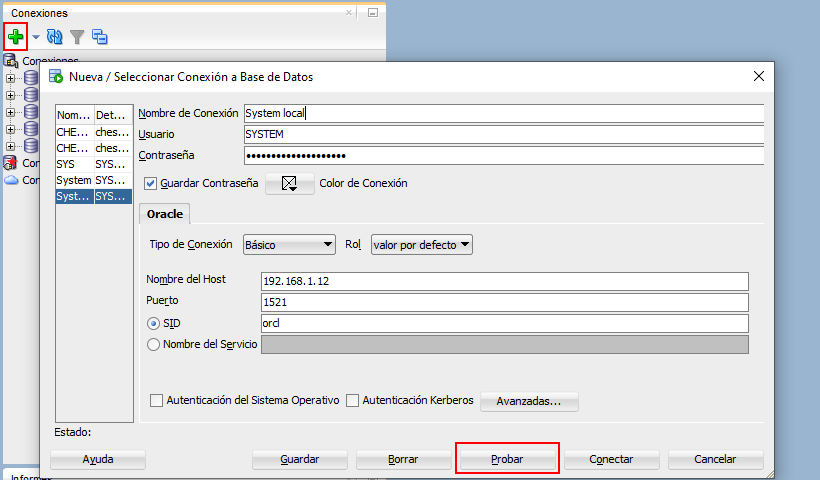
You have to click on the icon with the green plus sign to add a new connection. First, configure a connection for the SYSTEM user, which is created in the server installing process. You can use the Test button to check if the connection configuration is OK before saving it.
You can open a connection using the little cross at its left:
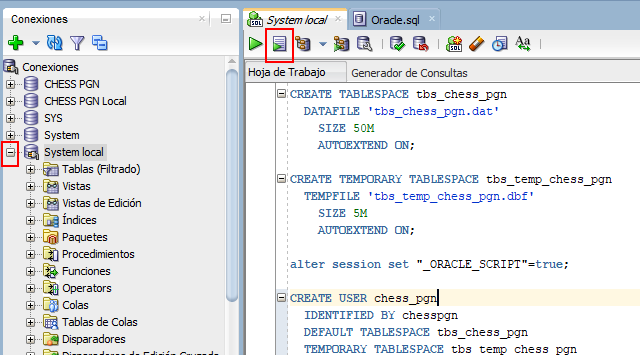
Copy and paste the Oracle.sql script text in the Scripts subdirectory of the ChessPosDB installation folder to create the user and the database. Use the toolbar button marked in red in the image to run the script, or press the F5 key.
Next, create a new connection for the user chess_pgn, with the password chesspgn, with which you have to launch the rest of the scripts: first, Oracle_objects.sql, and then Oracle_code.sql.
You have to open the ChessPosDB.exe.config file in Notepad to configure the ChesPosDB connection. It is an XML file:
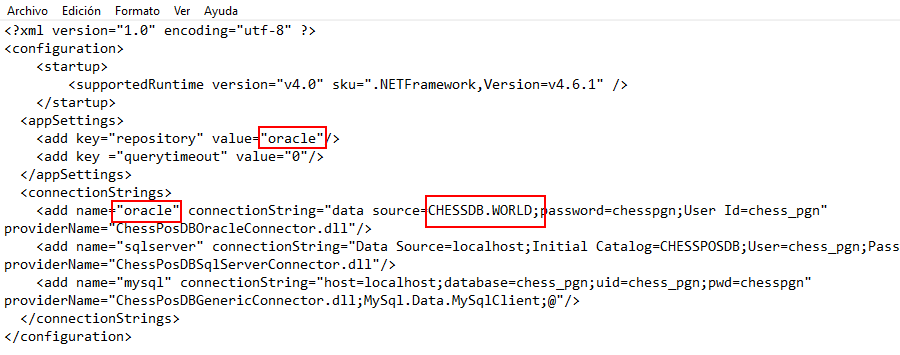
Ensure that the repository field value is the same as that of the Oracle connection name field (you can change them). Note that the data source field contains the name of the connection created before in the TNSNAMES.ORA file. If the database is on a different computer, you may have to open port 1521 on both computers, using the antivirus or Windows firewall settings.


