Posture recognition with Kinect I
One of the most interesting features offered by the Microsoft Kinect sensor is human bodies detection, which allows us to develop applications based on the different positions of the user's body and that can be handled remotely using those positions. To do this, it provides a series of points that represent the different joints of the body.
Depending on the model of the sensor we will have more or less points of the body. The most basic version corresponds to the Xbox 360. With the Xbox One's sensor, the tip of the thumb and forefinger of the hands and an extra point in the center of the spine are added. These are the different joints and their names:

Each one of the articulations is represented basically by three coordinates X, Y and Z, with the point (0,0,0) located in the sensor. It also indicates for each one of them the precision of the measurement: if it is completely determined, if it is an inferred position or if it could not be determined. As an extra data, we have an indicator that tells us if each hand is open, closed or in a position named lasso, with the index, middle and thumb fingers extended and the rest of them closed.
With those all data, it may seem simple to determine the position of the body, but actually it is quite complicated, and we must do some mathematical work to simplify the task. To begin with, we must divide the problem into a series of simpler problems. Although the number of different positions that the body can take are quite numerous, if we look at different parts of it separately we will see that the movements are most limited.
In this series of articles we will take the forearm as an example. If we keep the rest of the arm immobile, we will see that the only movement it can do is a limited rotation with the axis located at the elbow: from a position of about 180 degrees, with the whole arm extended, to just about 45 degrees if we bend it completely.
But since the arm can rotate freely around the shoulder, we must implement some kind of process of normalization of the position that facilitates the calculation of its position based uniquely on this angle.
To do so, we will only take the bones of the forearm and the arm, represented by the points that correspond to the wrist, elbow and shoulder. The first step will be to make the elbow the origin of coordinates, that is, the point (0,0,0). This is easily achieved by subtracting to each of these points the coordinates of the elbow point.
Once the origin of coordinates is set, the next step is to place the two bones in the same plane, for example the YZ. To do that, we must make use to vector rotation in a three-dimensional space. We have two vectors to rotate, the forearm, which goes from the elbow to the wrist, and the arm, which goes from the elbow to the shoulder. Since the elbow is at the origin of coordinates, we can apply the standard equations of rotation of a vector in the space around the X, Y and Z axes:
To rotate around the X axis: (counterclockwise)
X’ = X
Y’ = X * cos(a) – Y * sin(a)
Z’ = Y * sin(a) + Z * cos(a)
Where a is the angle to rotate the vector.
To rotate around the Y axis:
X’ = X * cos(a) + Z * sin(a)
Y’ = Y
Z’ = -X * sin(a) + Z * cos(a)
And to rotate around the Z axis:
X’ = X * cos(a) + Y * sin(a)
Y’ = X * sin(a) + Y * cos(a)
Z’ = Z
The target is to position the arm in such a way that both the point of the elbow and the shoulder are located on the Z axis, while that of the wrist is located at the corresponding point in the YZ plane, all without changing the relative position of the bones. The process requires three steps: in the first one, we place the arm bone in the YZ plane, rotating around the Z axis, in the second one, we turn this bone over the Z axis, rotating around the X axis, and finally, we rotate the bone of the forearm again around the Z axis to place it in the YZ plane. Of course, all rotations affect the three points; otherwise we would distort the position of the bones. This is the procedure in the form of a drawing:

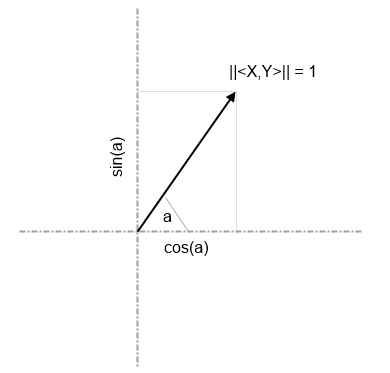
It is not necessary to calculate the angle that the vector forms with an axis to rotate it, we only have to calculate the sine and the cosine. As one of the axes will be only used to rotate the vector, we will use the projection of the coordinates in the other two axes to calculate the angle of rotation. We start by calculating the norm of the vector, that is, its length, to transform it into a unit vector, dividing each of the coordinates by the norm.
The norm is calculated as follows:
||<X,Y>|| = SQRT(X2 + Y2)
Where SQRT is the square root.
Once the vector <X, Y> has been converted into a unit one, to know the sine and cosine of the angle it forms with the X axis, for example, we will take as cosine the value of the X coordinate, and as the sine the value of the Y coordinate. For the angle with the Y axis, we have in turn to take the value of the Y coordinate as cosine and the coordinate X as the sine.

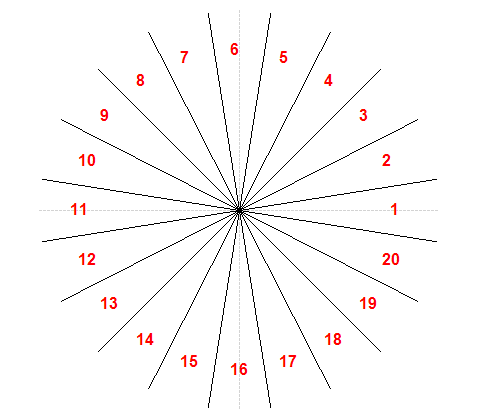
This same procedure will help us to finally determine the angle that the forearm forms with the Z axis. But to simplify, instead of the exact angle we will divide the whole circle into some sectors of equal amplitude. In the sample code that accompanies this series of articles I have used sectors of 18 degrees, which gives us up to 20 different positions:

Of course, this would not suffice to determine complex body positions. The same procedure should be applied to the other parts of the body, and store the relative positions of each one in an array or a text string. The forearm and the shin are the easiest parts, since they can only form an angle in a single plane. The leg, arm or torso can form angles with more than one plane, so in these cases the normalization will provide more than one value. At the end, as a result, what we will obtain is a series of angles, but in a number and a range of values lower than the possible coordinates of all points of the body joints, which will facilitate the work of determining the position of the body at every moment.
In subsequent articles, I will provide examples of code to perform these operations, which can serve as the basis to implement your own normalization algorithms.


