Neural networks and genetic algorithms II
In this second article on the application of evolutionary algorithms to the optimization of the design of neural networks, I am going to provide a small sample application that allows you to build and train networks, in addition to using this type of algorithms to find the best configuration for a given data set. The application allows generating artificial test data, and I provide the source code for you to be able to modify it, as you want.
In this link, you can read the first article in this series, where I explain the ideas that are the basis of this application. In this other link, you can download the source code of the GANNTuning application, written in csharp using Visual Studio 2017.
The application consists of a toolbar with the buttons corresponding to the different actions performed by the program, and some tabs to enter parameters or check the results:

Loading data
The first thing you have to do is to load the data with which you want training the neural networks. There are two possibilities: on the one hand, you can read them from a text file in csv format, on the other hand, you can generate fake data sets with the characteristics you want. I have coded a few types of examples, but it is easy to modify the code to add additional ones.
The neural networks built by the application have a single output neuron, and they are made-up of neurons with a bipolar sigmoid activation function, in order to simplify the code; they target is to discriminate patterns using supervised learning, by means of the backpropagation algorithm. Regarding the data set, this means that each line of the csv file represents a sample, whose last column represents the identifier of the corresponding pattern. This identifier must be an integer, although its value does not matter. Internally, the output range of the network, (-1, 1), is equally distributed among the patterns, in order to maximize the difference of results between them; for example, if there are only two different patterns, the first one will have internally the value 0.99 and the second one will have the value -0.99. The data is normalized by scaling the values in the range [-1, 1], if you want another type of normalization, or none, you have to modify the source code.
To load data from a csv file, use the second button on the left side of the toolbar, and select the file in the dialog box. With the first button on the left, it is possible to generate fake data sets, according to the configuration selected in the Training tab:

In the Fake drop-down list, you can select the type of fake data set. The types are the following:
- Random: All values are generated randomly. This kind of data set should not show any pattern.
- Pulse: the number of values per sample is divided by the number of patterns and, for each pattern, a sample is generated with that number of positions with a negative value and the rest with a positive value. For each pattern, a different slice of data is chosen for the negative values. In each sample, a single value is randomly generated, which is used for both negative and positive positions, forming a pulse pattern.
- RandPulse: it is like the previous one, but each value, positive or negative, is different and is obtained randomly.
- Equal: only one pattern is generated and all the others are an identical copy of this one. It is a set impossible to separate.
- Noise: it is like RandPulse, but adding random noise with some probability.
The number of different patterns that we want to generate must be written in the Patterns text box, the number of samples per pattern in Samples, and the number of values per sample in Values.
Building the network
The network design parameters are introduced In the Network tab. This is useful in case you want testing one given configuration. When you launch the automated procedure of selection using genetic algorithms, it is not necessary to enter anything, because the application tries different configurations that change continuously.
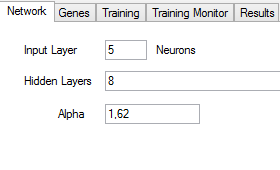
You have to enter the number of neurons in the input layer in the Input Layer text box. You can left blank Hidden Layers if you do not want hidden layers, or you can write the number of neurons in each layer separated by commas. Alpha is the parameter to configure the sigmoid activation function of the neurons.
Training the network
You can provide the parameters to train the network in the Training tab. These parameters are used either to train a single network manually or during the genetic selection process:
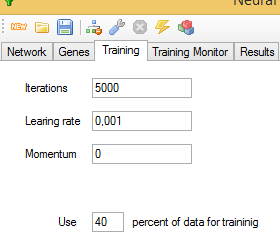
You should enter the number of iterations that the training algorithm will perform before finishing in the Iterations text box. Learning rate controls the rate of weight change during learning, and Momentum is the proportion of the previous weight updates used in the calculation of the new ones, in the current iteration, trying to avoid falling into local minima.
You have to indicate too the percentage of samples used for training. The application will try to provide an equal number of samples for each of the patterns.
You can initialize the network with the fourth button on the left of the toolbar, so that the training starts from scratch; otherwise, you will continue training the last trained network without reinitializing the weights. The fifth button launches the training process, and you can watch they evolution in the Training Monitor tab:
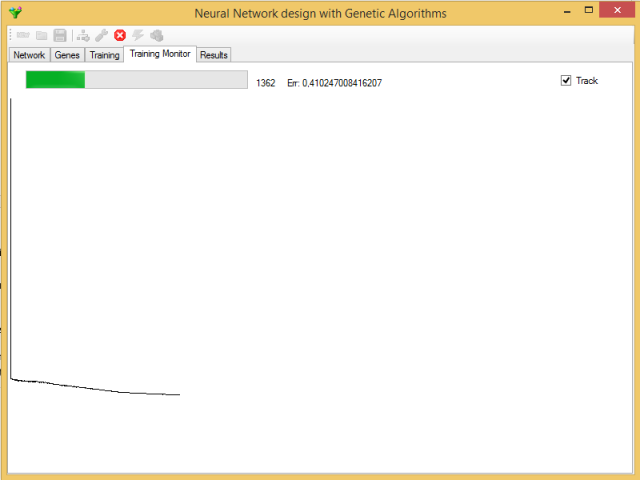
You can disable this monitoring by unchecking the Track mark, since during genetic selection you might prefer to gain in processing speed. The error value shown is the average of all the individual sample errors in the current iteration.
During the training phase, only the Cancel button remains active. You can stop the training in the current iteration by pressing it.
You can save the trained neural network in a file using the third button on the left side of the toolbar, and selecting the corresponding file type in the dialog box. You can reload later this network using the second button on the left.
Genetic selection
You can configure the genetic algorithm in the Genes tab:
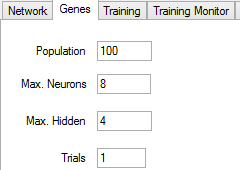
You should write the maximum population in the Population text box, being 100 networks the minimum value. You must also enter the maximum number of neurons per layer and the maximum number of hidden layers. Trials is the number of times that each network is trained in each generation. The accuracy of a network can depend a lot on the initial values, which are randomly selected, so it may be a good idea to repeat the training process more than once, keeping the best cost reached, if the time taken by each training round allows it.
You should click on the last button in the toolbar to launch the genetic selection. First, the initial population is generated, training each network as many times as you have indicated. You can see information about the process in the Results tab. You can also cancel the process, with the same Cancel button that serves to cancel the manual training, but you will have to wait until the current generation finishes processing for the whole process to finish.
You can save in a file the current gene population using the Save button and selecting the corresponding file type in the dialog box. In addition, you can save a csv file with a report of the different genes in the population. You can load later the genes to continue the procedure. The application also saves, at the end of each generation, the gene population in a temporary file named gentmp.gen, in the directory where the executable is. The neural network for the best gene is also saved in the file gentmp.net.
The criteria followed to select the best network will be explained in the following article, along with the most relevant source code, so that you can modify it as you see fit.
Checking the results
The seventh button in the toolbar is to check the efficiency of the trained network. The current network will try classifying the complete set of data. The result is shown in the Results tab:
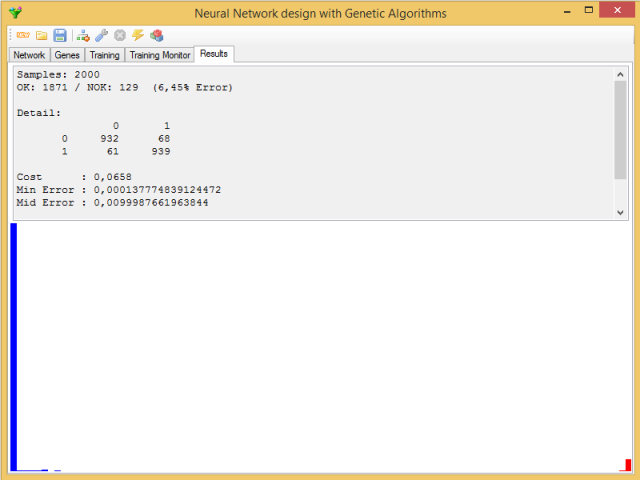
The upper half contains the percentage of successes and failures and their distribution among the different patterns, as well as a series of statistics referring to network errors: maximum error, median error, minimum error, mean error and its standard deviation, in addition to the value of the gene's cost function for the network.
In the bottom half, you can see a histogram with the distribution of the errors, in order of magnitude from left to right; in red, the errors that drive to incorrect classifications.
In the next article in the series, I will explain the most relevant parts of the source code.


