DataGridView with formula support
In this article I will present a custom DataGridView control that allows using formulas composed by arithmetic expressions and references to the different cells of the control. In addition to the class library with the control, I have prepared a small application to show how to use the different features it offers.
In this link you can download the source code of the FormulaDataGridView project, written in csharp using Visual Studio 2015.
The project consists of three class libraries. FormulaDataGridView is the implementation of the control itself, BNFUP implements the formula compiler, and GridFormulas contains the execution engine of the compiled formulas. In this article I will comment on the use of the DataGridView. In this other article you can read more about the syntax definition and rule editor of the BNFUP universal compiler.
Syntax of the formulas
The formulas that can be used with the control are assigned to each of the DataGridView cells, they consist of arithmetic expressions that can use the following operators: subtraction and unary minus (-), sum (+), product (*), quotient (/) and exponentiation (^). You can also use sub formulas in parentheses.
The elements to which you can apply these operations are the following:
- Numbers: they can have decimals.
- Variables: There are two variables, col is the index of the column of the cell with the formula, and row is the index of the row.
- Cell references: they are written in brackets ([ and ]) and the coordinates of the column and the row are separated by a colon (:), first the column and then the row. The coordinates can be any expression, but their value is rounded to an integer value. For example, [col: row-1] refers to the cell above the current cell. Its value is the value of the cell. If the cell is empty or its value is not numeric, it is ignored.
- Aggregation functions: These functions process a range of cells. All of them have two parameters, separated by the comma character (,), the first must be the reference to the first cell to be processed and the second the reference to the last cell. They can be in different rows. The functions available are: sum (sum of cell values), prod (product), avg (arithmetic mean), max and min (which return the maximum and minimum values respectively), var and svar (variance and sample variance) and sd and ssd (standard deviation and sample standard deviation). For example, sum([0: 0], [col-1: row]).
- Mathematical functions: They only have one parameter, which can be any arithmetic expression. There are the following functions: ln (neperian logarithm), log (base 10 logarithm), exp (the number e raised to the argument), sqrt (square root), abs (absolute value), ceil (the minor integer greater than or equal to the number), floor (the largest integer less than or equal to the number) sin (sin), cos (cosine) and tan (tangent). For example sqrt([0: 0] * [1:0] + ln (5)).
The language-defining syntax is found in the formulas.bnf file, in the TestForm project. It is a binary file, which can be modified to extend the language. To open it you will need the BNFUPEditor editor, which you can download from the BNFUP project, in the article linked above.
To extend the language it is also necessary to modify the GridFormulas project classes. The previous article also explains everything necessary to modify this type of projects.
TestForm application
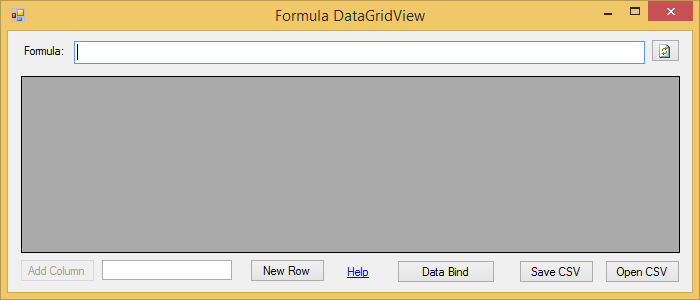
The TestForm sample application shows how to use the control in your own projects. It looks like that:

The first three controls are used to add columns and rows to the DataGridView. To add a new column, type a name in the text box and click Add Column. You can add rows once the grid has columns with New Row.
The Data Bind button simply creates a DataTable object with three columns and two rows, with two formulas in the last column, and binds it to the control using the DataSouce property. You can use this example to see how to pass formulas to the DataGridView control directly from data. Here is the event handler code:
DataTable dt = new DataTable();
dt.Columns.Add("A0");
dt.Columns.Add("A1");
dt.Columns.Add("Total");
DataRow row = dt.NewRow();
row["A0"] = 1;
row["A1"] = 3;
row["Total"] = "=sum([0:row],[col-1:row])";
dt.Rows.Add(row);
row = dt.NewRow();
row["A0"] = 5;
row["A1"] = 7;
row["Total"] = "=avg([0:row],[col-1:row])";
dt.Rows.Add(row);
frmGrid.Columns.Clear();
frmGrid.DataSource = dt;
frmGrid.BindFormulas();
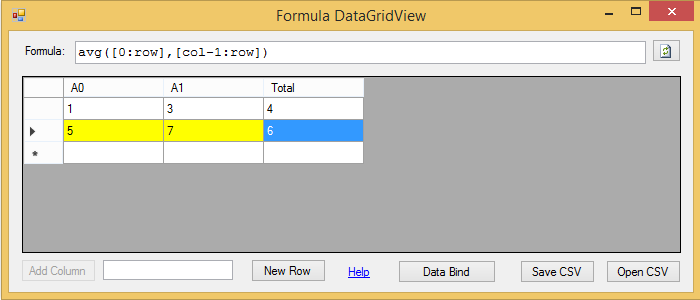
Formulas must be passed with a = character at the beginning, to recognize them as such. Once the control is bound, it is enough to call the BindFormulas method to convert them to compiled formulas. This is the result:

When you select a cell with a formula, it appears in the TextBox control associated with the FormulaDataGridView, using the FormulaEditor property. You can modify the formula and recompile it with the button to the right of the TextBox. This button simply calls the UpdateFormula method, without parameters.
You can also update the formula of a particular cell programmatically with another version of the UpdateFormula method, which receives the formula text, the column and the row index of the cell as parameters.
You can see that the cells referenced by the formula are highlighted in yellow. This is implemented in the ShowReferencedCells method of the TestForm application:
private void ShowReferencedCells()
{
    foreach (DataGridViewRow row in frmGrid.Rows)
    {
        foreach (DataGridViewCell cell in row.Cells)
        {
            cell.Style.BackColor = Color.White;
        }
    }
    foreach (DataGridViewCell cell in frmGrid.SelectedCells)
    {
        FormulaBase frm = frmGrid.GetFormula(cell.ColumnIndex, cell.RowIndex);
        if (frm != null)
        {
            foreach (Point p in frm.CellReferences)
            {
                frmGrid.Rows[p.Y].Cells[p.X].Style.BackColor = Color.Yellow;
            }
        }
    }
}
The formula can be obtained with the GetFormula method of the FormulaDataGridView control, passing the index of the column and the row. The object it returns is of FormulaBase class, which has a CellReferences property that enumerate all the cells referenced in the form of Point structures, with the column in the X property and the row in the Y property.
If the form editor is empty when you call the UpdateFormula method, the formula is removed, even though its value remains in the cell.
The other two buttons are for storing the contents of the FormulaDataGridView in a csv file and for loading the data from a file of the same type. The first row of the file will contain the names of the columns, and the rest of the rows the data. Cells with formulas are saved with the text of the formula preceded by a = character. The character used to separate the fields is the semicolon (;), which is not used in any of the expressions in the formulas, so, if your data contains this character, the file will not be saved correctly
The FormulaDataGridView control has two methods to deal with this type of files, SaveCSV and ReadCSV, to which you have to pass as parameter the file name. You can load a sample file that is in the directory of the TestForm application, gridsample.csv.
Finally, there is a method, Initialize, which clears all formulas in the FormulaDataGridView control, and a LanguageFile property with which you can change the file with the syntax used by the formulas, which must be a .bnf file, generated with The BNFUPEditor tool. Simply assign this property a text string with the path of the file.
And that's all you need to know to be able to use this control in your applications. Remember to add the references to the FormulaDataGridView.dll, BNFUP.dll, and GridFormulas.dll assemblies in your project.


